Welcome back! You should now have six screens of design awesomeness that you created in the first part of this tutorial. Good job! Let’s now put the prototyping tool, Flinto (for Mac) to work, and bring our screens to life.
Quick Note: We will be keeping things relatively simple. Not everything is going to be clickable in this tutorial. But, honestly, once you’ve had a play around with Flinto and discovered how user-friendly it is, you’ll be ready to make the app interactive in every spot imaginable.
Installing & Setting up Flinto
If you haven’t already, go ahead and grab the Free Trial of Flinto (for Mac) and don’t forget to download the Sketch plugin too.
Install Flinto, and the Sketch plugin, and then we’ll be ready to create some proto-goodness.
Firing up Flinto
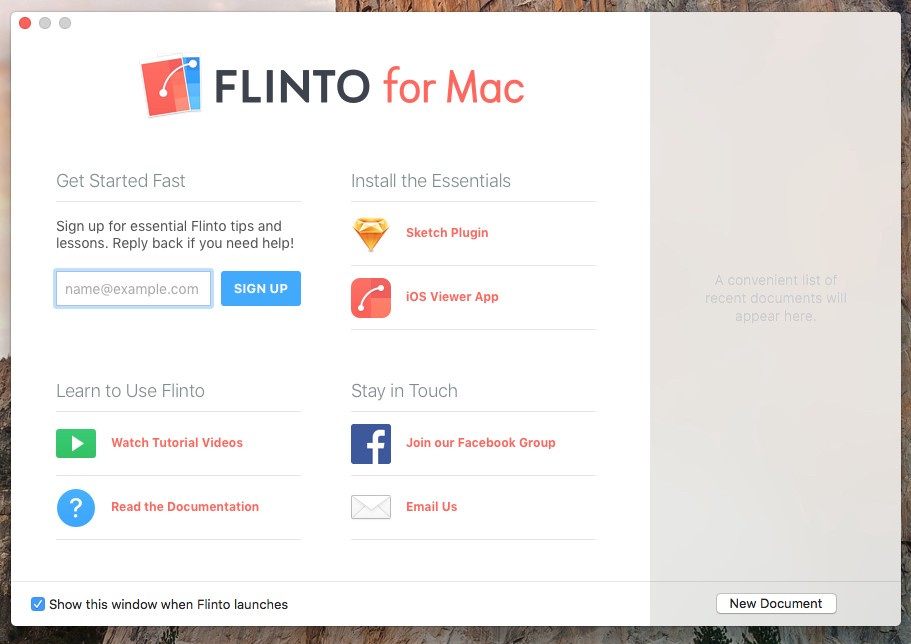
After opening up Flinto, you’ll be presented with the splash screen, where you can go ahead and click on New Document. This, in turn opens up the New Document window (Yes, I know, the obvious has well, and truly been stated).
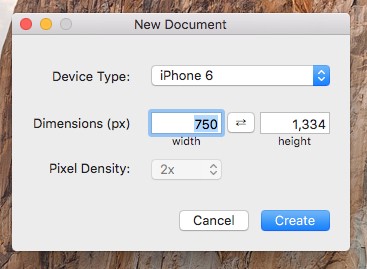
From there, set the Device Type to iPhone 6, and click Create.
Once you have your New Screen displayed, you can use the same Keyboard Shortcuts as Sketch…
- Zoom In
Cmd + (+) - Zoom Out
Cmd + (-)
…to easily zoom in, and out on your screen until it’s displayed suitably for your setup.
Quick Note: Again, the same as Sketch, you can move around the canvas by holding Space, and clicking and dragging.
We of course, won’t be needing the screen that has just been created, as we’re importing the screens from Sketch. So delete that screen either by pressing Delete, or right-clicking on the screen, and choosing Delete.
Remember to quickly save the new document, and give it a name, for the Sketch plugin to reference very shortly.
Jump back to Sketch, and with all your Artboards (screens) selected, choose Plugins > Send to Flinto from the Menu bar, or use the Keyboard Shortcut Shift + Ctrl + Cmd + F.

From the popup window, the plugin knows to scale the artwork up (to 2x) for the iPhone 6 Retina screen, so you can leave all the settings as they are, and click Send.
In the next window, check that the Flinto file you saved earlier is selected, and click Merge.
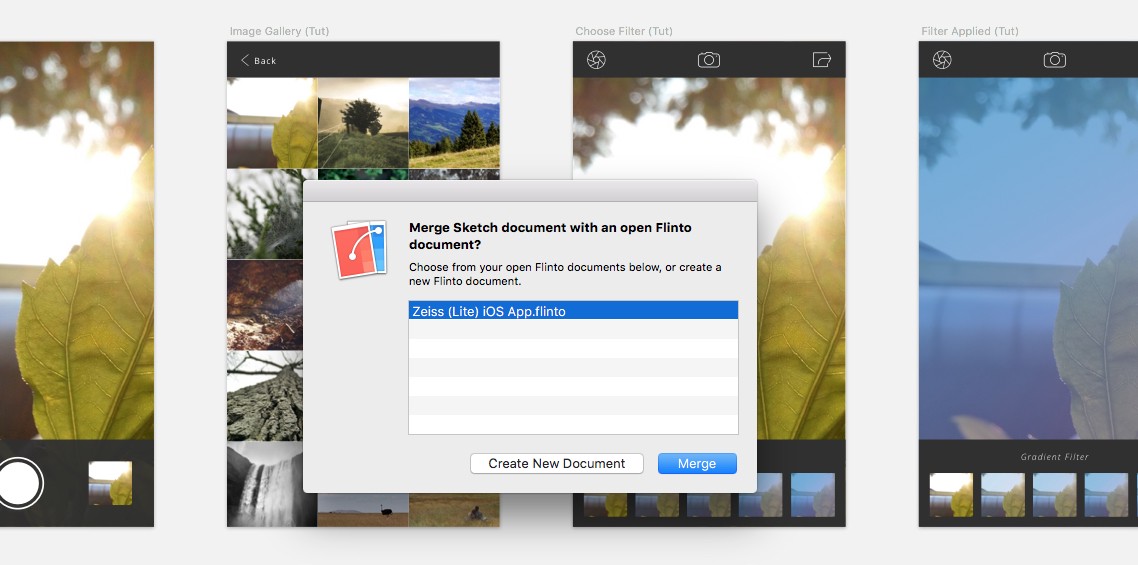
Back in Flinto, you will see all your screens have been imported into the application. From the Layers Panel you will see that all your Layers/Groups have been imported, just as they were in Sketch, and that any Vectors have been converted to Bitmaps to increase the speed of your prototypes. Awesome!
Quick Note: If (in the Layers Panel) your screen names are not in the same sequence as they were in Sketch, you can easily click, and drag to re-order them correctly.
You will find there is a lot of similar actions, and keyboard shortcuts to those that you use in Sketch. Flinto does make the transition between the two applications feel very familiar, which I love!
Welcome Screen
With the Welcome screen being, of course, our Home screen, we need to let Flinto know that. So with that screen selected, select the Home Screen option from Screen Properties in the Inspector Panel.
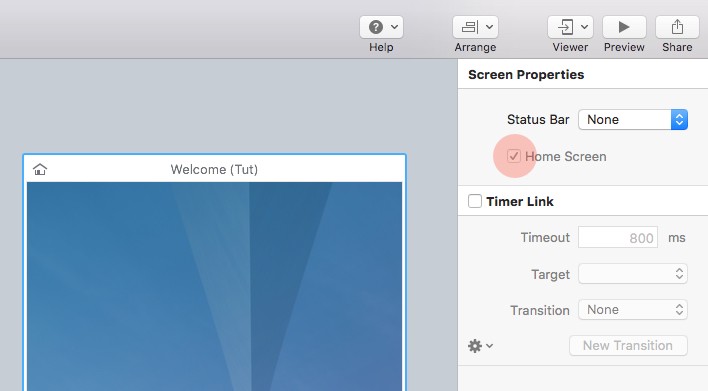
You will now see a little Home icon appear on both your screen, and in the Layers Panel.
Now, we’re going to add a timed transition from the Welcome screen, to the Viewfinder screen. So select Timer Link in the Inspector, and enter the following settings (or whatever you choose):
- Timeout: 1000ms
- Target: Viewfinder
- Transition: Fade In
Now would be a good time to fire up the Preview window. I know there’s not much to see just yet, but from here on in you have the ability to view your changes as they happen. Click on the Preview icon in the Toolbar, or use the simple shortcut Cmd + P.
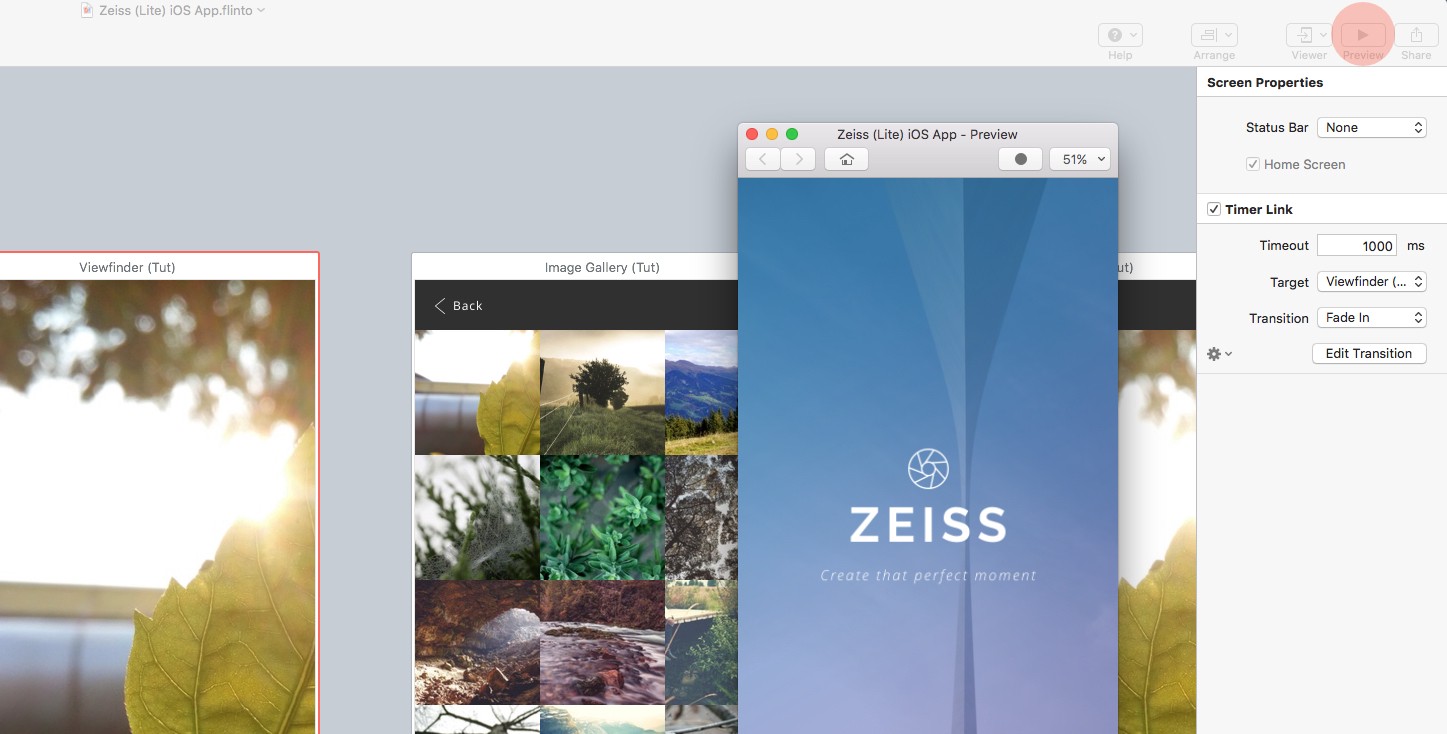
Quick Note: If you haven’t already, you can also grab the Flinto App from the iOS App Store.
Viewfinder Screen
From the Viewfinder screen, we’re going to do a simple transition (via the folder icon) to our Image Gallery screen. We’ll be sticking with the default transitions, but please feel free to go wild, and click on New Transition to add one of your own if you so desire.
So, select the folder icon, and click F to create a new link. Drag out the orange thread across to the Image Gallery screen, and click to bring up the Gesture/Transition window.
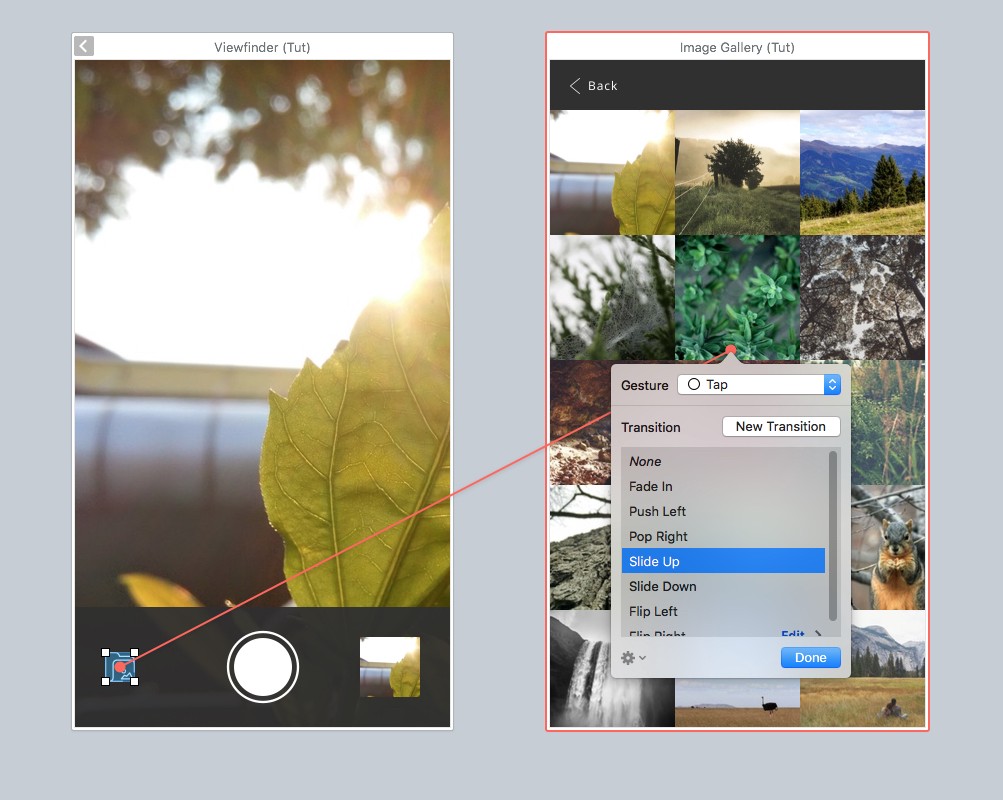
From here choose the Gesture that you require. Tap would be the sensible option for this type of link. Then choose a Transition. I’m going with Slide Up. Then click Done. Transition all set. Test it out in Preview, or on your iOS device!
Decide a certain transition is not really rocking your kasbah? No problem, just jump over to the Inspector Panel, and edit the transition from there.
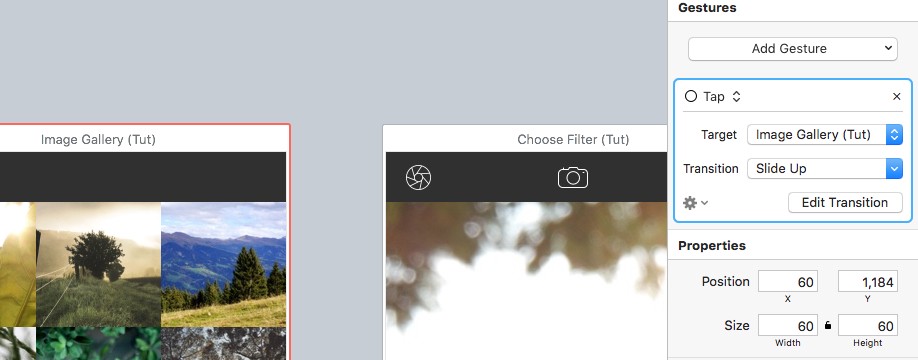
Image Gallery Screen
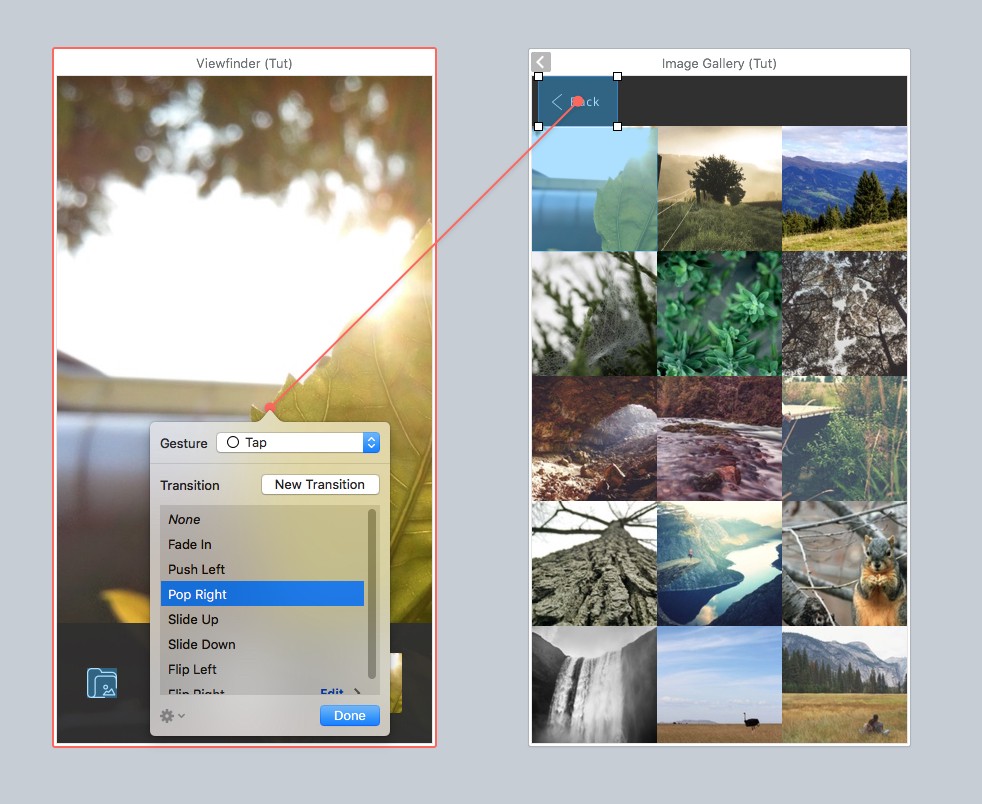
So, firstly, we have the Navigation Bar at the top of the screen with the Back button that we created in Sketch, and we want to easily navigate back to our Viewfinder screen. Let me show you how to do that:
Firstly click D to draw out a Link Hotspot around the back button, and then simply drag the Link Thread back across to the Viewfinder screen, and choose a Gesture, and Transition.
Quick Note: In this instance we wanted the back button to go back to the Viewfinder screen, and that screen only. Later in this tutorial I’ll show you how to set a back link that will take into account that you may have entered a certain screen from different access points.
Now remember, in the first part of the tutorial, when I mentioned about our image thumbnails sitting outside of our Artboard? You do, cool. This was so we could test out the Scroll Group functionality of Flinto, which is pretty awesome! Let’s set that up on this screen:
So firstly select the image thumbnails layer (which you will see has been converted into a simple Bitmap layer for us to use inside of Flinto).
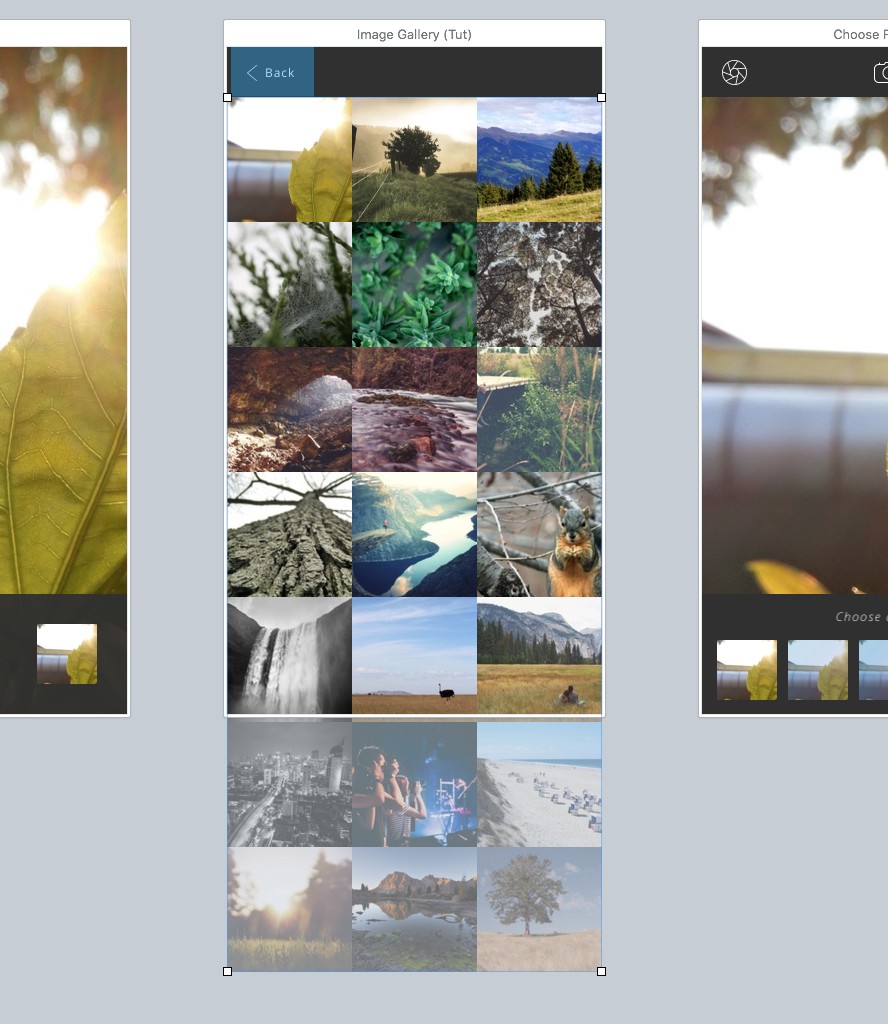
You will see that once it has been selected, that it will show the overlap outside of the Artboard, making it easy for us to reference in the next step.
Choose Scroll Group from the Toolbar, or use the shortcut Alt + Cmd + G to turn this layer into a scrollable area. If you look at the Layers Panel, you will see our thumbnails layer is now inside of a scroll group folder.
Go ahead, and test this out in Preview, or on your device, and you will see the thumbnails scroll on the screen, and up underneath the navigation bar. Nice!
We’ll keep our Scroll Group with the default settings, but please feel free to have a play around with the many options available to you in the Group Options section in the Inspector Panel.
For our first thumbnail, we want this to link through to our next screen (Choose Filter), so again, draw a link hotspot (D) around the thumbnail and then set a link to the next screen.

The first thing you may notice about Choose Filter screen is that we don’t have a back button!! The horror! But how do we get back to the previous screen if we need to?
Let me show you:
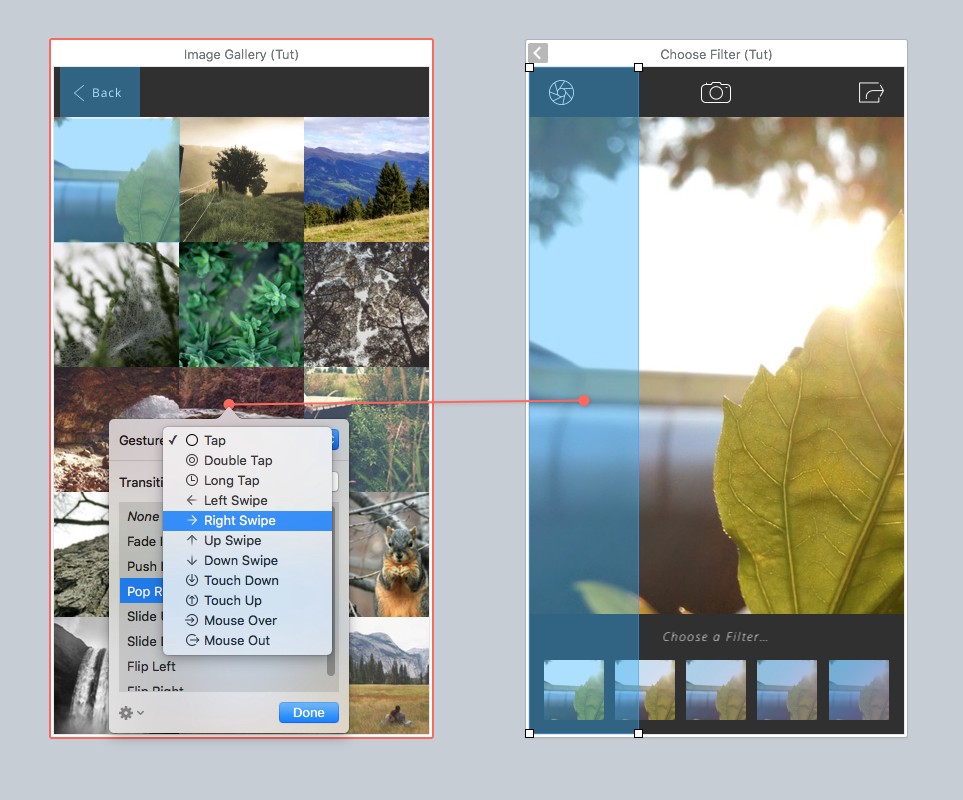
Click (D) to draw a link hotspot, and have it the full height of the screen, and about 220 in width, and place this at the left side of the screen. Then simply link this back to the previous screen, and for the Gesture choose a Right Swipe, and for the Transition choose Pop Right. Now you can easily navigate back to the previous screen with a Swipe Gesture. Problem solved!
Go ahead and do this for the Filter Applied screen too.
Transition Designer
One of the best features (amongst many others), is the Transition Designer. Up until now I’ve just shown you the default Transitions that are available. But once you decide on trying a transition of your own, that is where the Transition Designer comes into play.
Hopefully you can see from our Choose Filter, and Filter Applied screens we want to have a transition where one of the filter options is chosen at the bottom of the screen, and in turn the large image is changed to reflect this.
We’ll keep it pretty simple. The far right image thumbnail is clicked on to change the large image to one with the gradient applied (as shown on the Filter Applied screen), and then to switch back to the default image when the thumbnail on the far left is clicked. Let’s get this type of interaction up, and running with the Transition Designer.
On the Choose Filter screen draw out a link hotspot (D) on the last thumbnail, and connect it to the Filter Applied screen. Then click on New Transition…
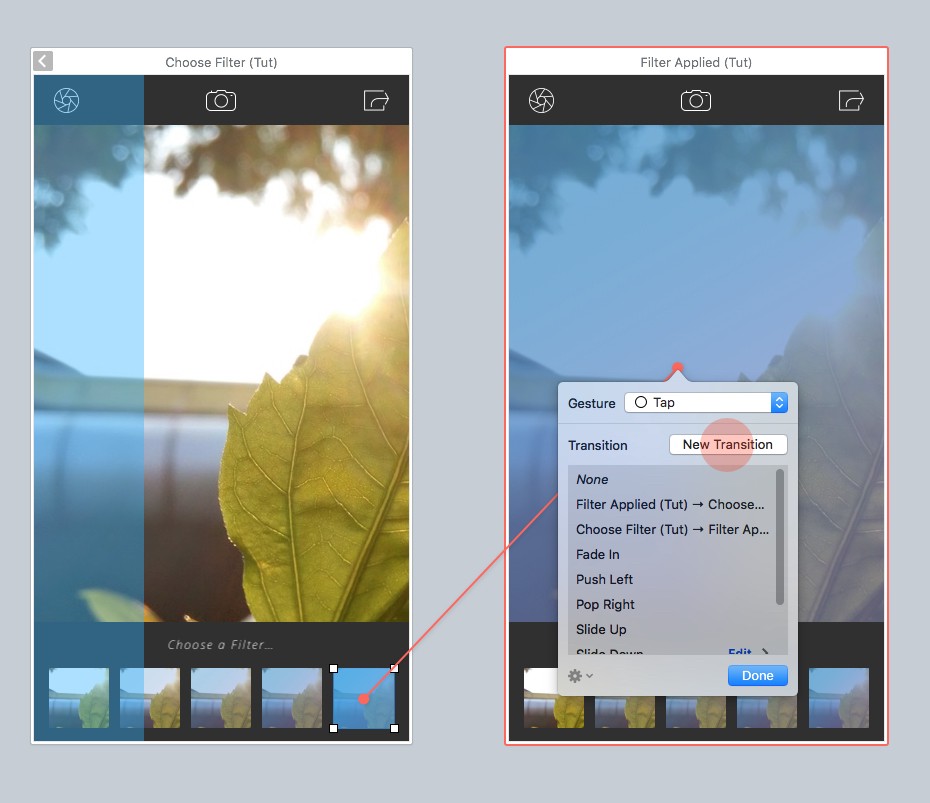
…and, boom! We’re into the Transition Designer.

You will see the 2 screens that we want to transition between, and you will see these marked accordingly in the Layers Panel (Start Screen, and End Screen)

To achieve the effect that we require, go ahead and drag the End Screen (Filter Applied) on top of the Start Screen (Choose Filter).
Quick Note: You can select the whole screen by clicking on the red border around the screen, and then dragging it on top of the other screen. Take note of the red guidelines to align it perfectly.
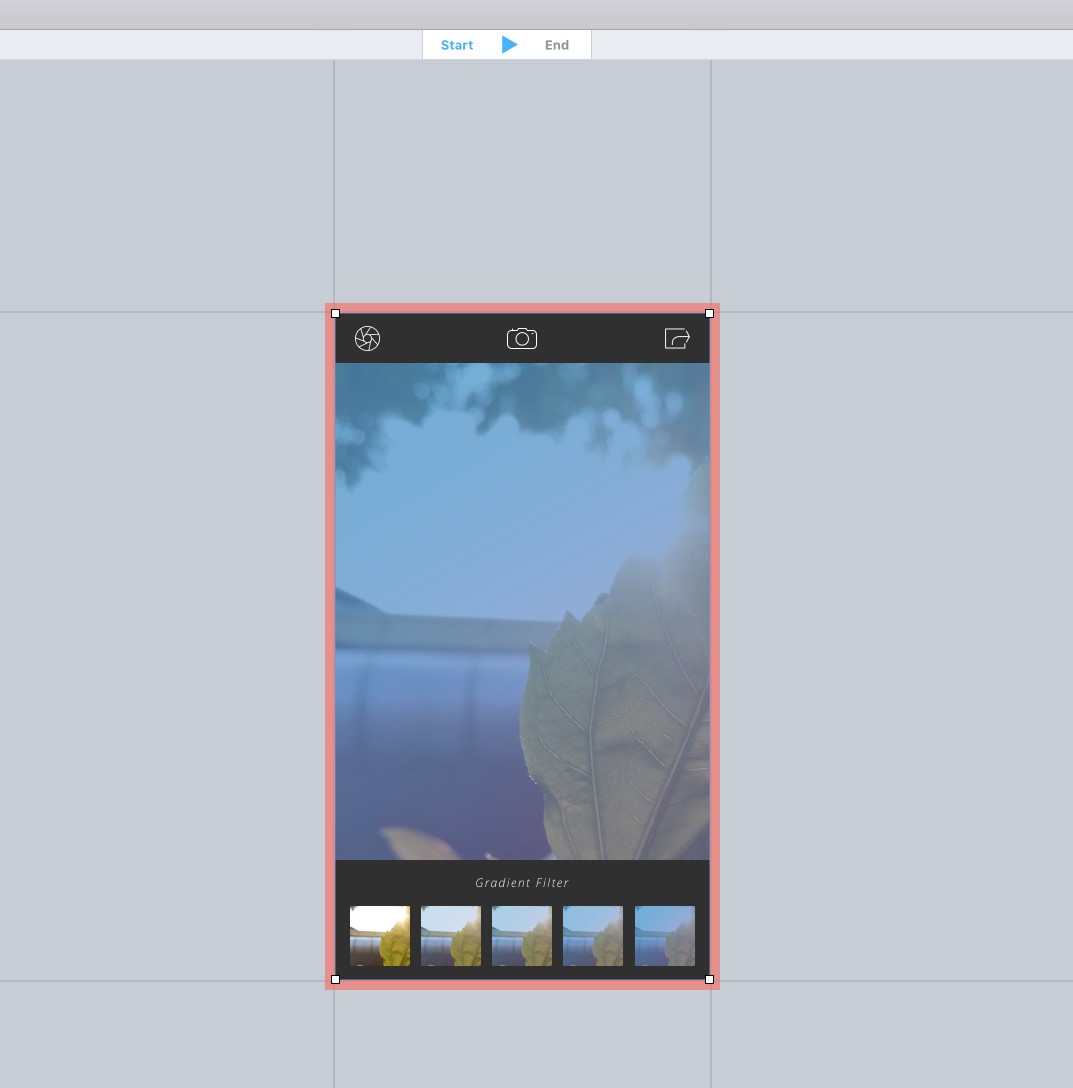
Of course, you may now be thinking ‘hang on, I don’t want to show the filter applied at the start of the transition‘. Of course you don’t. So select the gradient layer (on the End Screen) in the Layers Panel:
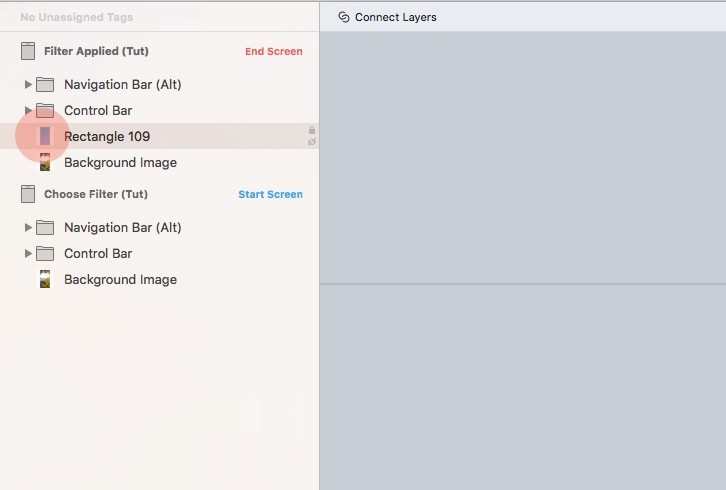
And then from the Inspector Panel, reduce the Opacity of that layer down to 0%. And that’s it.
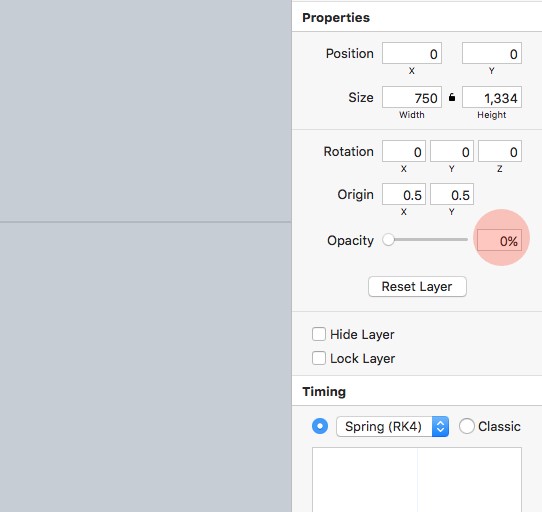
You can click the Play controls at the top of the Canvas area to see the transition in action, then, once you’re happy click on Save & Exit to go back to the main window.
We want to have the ability to also go back to the image with no gradient applied. So similar to before, draw out a link hotspot (D) on the far left thumbnail of the Filter Applied screen, linking back to the Choose Filter screen, and choose New Transition from the popup window.
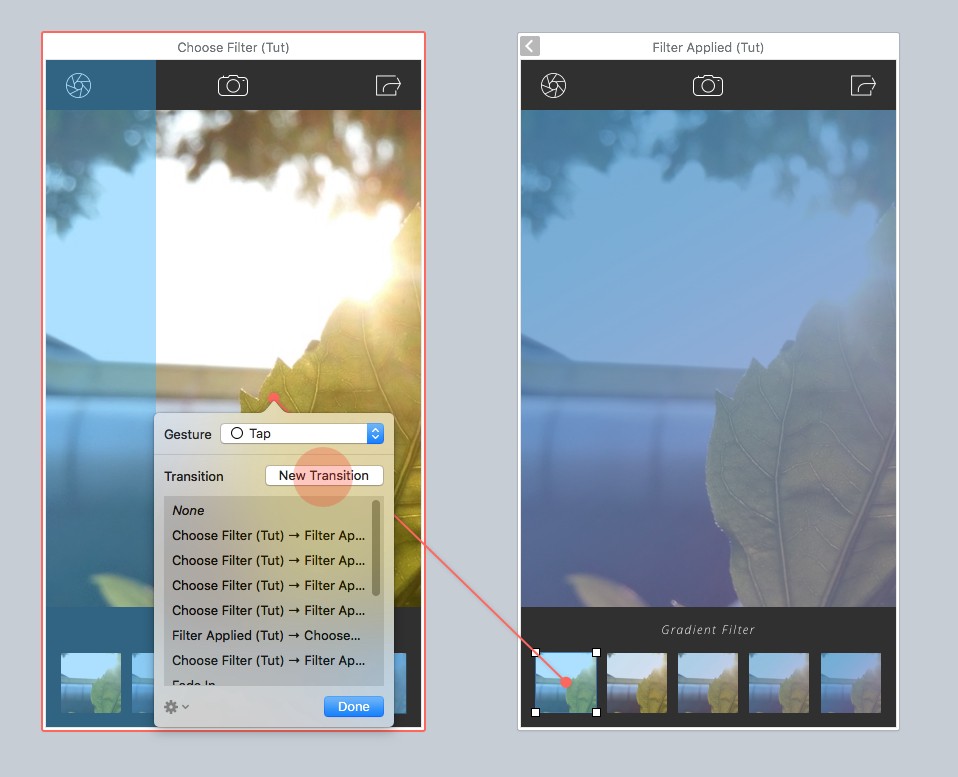
Back in the Transition Designer, drag the Start Screen (Filter Applied) on top of the End Screen (Choose Filter). We want to be still showing the gradient at the start of our transition, so select the background image layer of the End Screen (Choose Filter) and reduce the Opacity down to 0%.
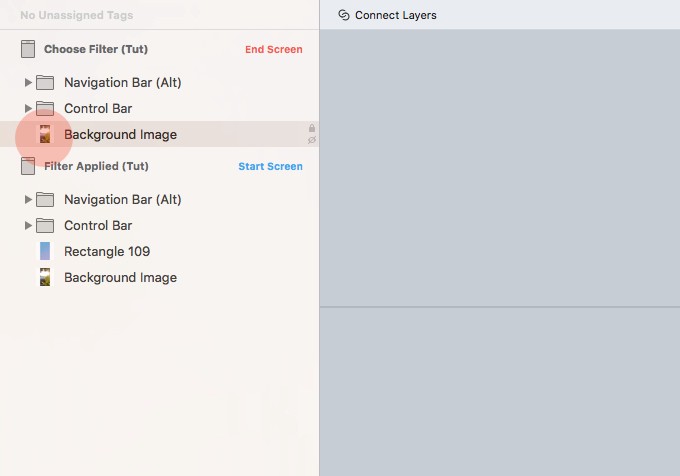
Click Save & Exit, and why not give it a quick test with Preview Cmd + P.
Now in this part of the tutorial, I’ve only skimmed the surface of what the Transition Designer can do. It’s a powerful tool, and bags of fun to play around with, so for the last screen in this tutorial we’ll push it a little further. ‘Push it real good’ as Salt-N-Pepa once sang!
Information Screen
With this screen we have 2 points of access (via the shutter link), one from the Choose Filter screen, and the Filter Applied screen.

Let’s deal with the Choose Filter screen first.
Draw a hotspot link (D) on the Choose Filter screen, and choose New Transition, which will bring you back into the Transition Designer.
From the following image, you can see that on the End Screen (Information) I have pulled out the logo, and buttons from the screen in a staggered manner, so when this Transition is used those elements will slide in one at a time. That’s the great thing about Flinto. You can try so many different transitions and Flinto will fill in the animation for you (all without the aid of a timeline).
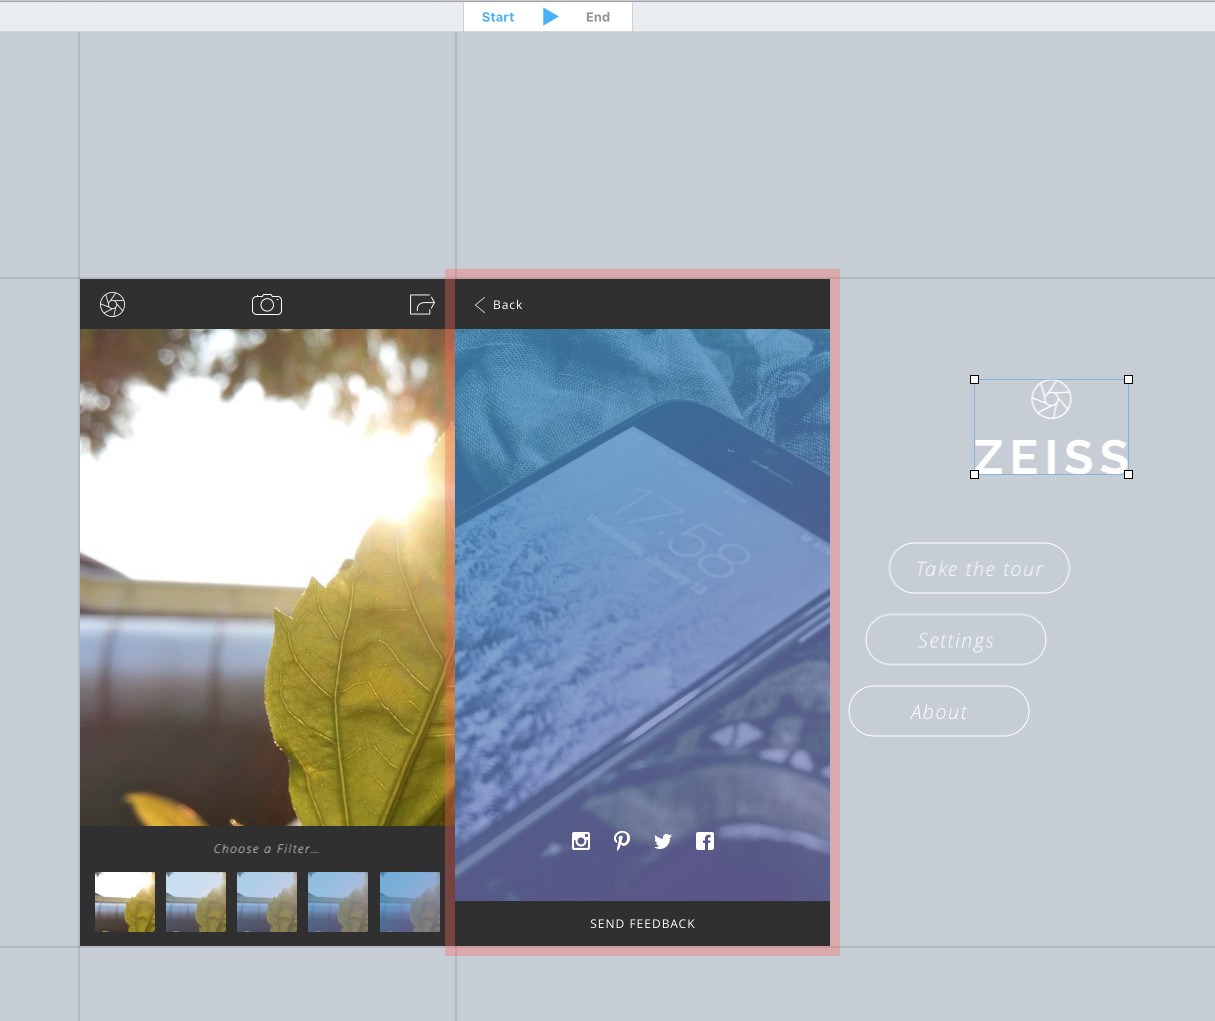
I also tweaked the Timing settings for those layers (logo, and buttons). Changed it to Classic, and increased the Duration to 700ms.

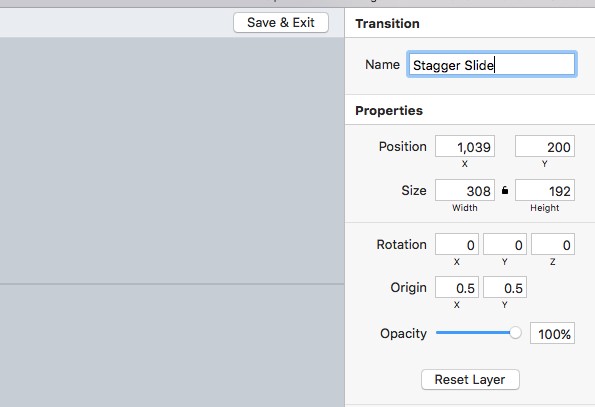
Give your Transition a name. I called this one Stagger Slide. And then Save & Exit.
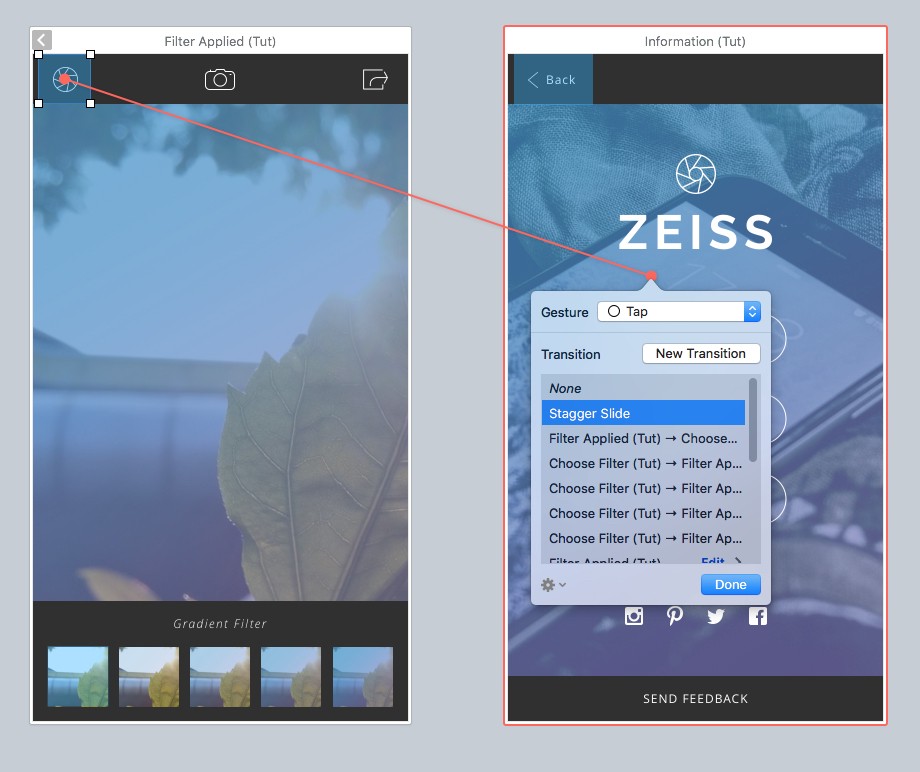
You can now go ahead and create another Link Hotspot (D) on the Filter Applied screen, and choose the Transition you just created from the available options.
To finish up, we want the back link on the Information screen to take into account that we have entered this screen from different access points. So draw out a Link Hotspot (D), and drag the Link Thread to the orange arrow which appears at the top of the Information screen. This will create a Back Link which is not set to a specific screen.

And I think we’re all done here!
I’ve only touched on a small portion of what is possible with the Transition Designer, but I’ll leave you to have fun with it, and explore some more.
I hope with this tutorial you can see how Flinto is such a great companion application to Sketch, and one that deserves some attention on your next project.
You may also like to take a look at my previous Sketch tutorials:
Looking for the fastest, most practical way to learn Sketch?
Sketch App Essentials is the perfect guide to help you realise the full potential of this amazing application. Take a look here.
Use the offer code MEDIUMESSENTIALS to receive 20% OFF any of the Packages.
Related Topics
Top